(2018)
Vis Insita
Vis Insita
Vis Insita
Vis Insita
Vis Insita
(2018)
Vis Insita
(2018)
(2018)
(2018)
(2018)


A premapped and customizable interface
to control Eos using the Fighter Twister MIDI controller.
Twistereos
(The video is very outdated but gives you the idea !)
1. TwisterEos
2. The Midi Fighter Twister (MFT)
2. First steps with TwisterEos
2.1. Downloading and launching
2.2. Overview of the interface
3.1. Presets
3.2. FCB mode
3.3. FADER mode
3.4. Eos Snapshots
3.5. Additional options
1. Future dev
5. Contact
6. Thanks
3. Demo pack
rec_edited.jpg)
Midi Fighter Twister - DJTech Tools

Main interface of TwisterEos
-
ABOUT
1 - What is TwisterEos ?
TwisterEos is a software interface for controlling ETC's Eos lighting software using the Midi Fighter Twister (MFT) controller. It has been designed to offer a simple, comprehensive and affordable solution for users of the Nomad version, and can also be integrated into more complex systems.
TwisterEos avoids the need for tedious MIDI/OSC mapping by making MFT commands pre-assigned and optimized for Eos, while allowing customization of certain elements such as the parameters of the projectors you wish to control, snapshots, macros, etc., via an ergonomic and intuitive graphic interface.
TwisterEos runs on Windows 10+ and macOS without the need to install any files on your computer (it's an executable).
Unlike the majority of control interfaces for Eos, TwisterEos realistically emulates the behavior of the encoder wheels on physical Eos consoles, making control of FCB parameters fast and fluid..
With TwisterEos, the Eos GUI responds in real time to commands from the MFT (e.g. parameter display in the Encoder Display), and conversely, feedback from Eos is displayed on the MFT LEDs (e.g. fader level and type).
In addition to the initial commands offered by the MFT's buttons, logical and easily memorized button combinations managed by TwisterEos expand the controller's possibilities, as well as the number of commands directly accessible in Eos.
MAIN FEATURES
TwisterEos allows you to manage:
-
18 pages of faders, included Bump, Group/Assert and Load keys.
-
The Master fader and the Rate.
-
All the FCB parameters (coarse/fine/superfine adjustment, Home, Min, Max).
-
The automatic display of FCB parameters in Eos Encoder Display.
-
The Level Wheel with a permanently accessible rotary knob.
-
24 customizable Eos Snapshots.
-
4 customizable Eos Macros.
-
The Size and Rate of Effects in Eos Cues.
-
Any gamepad to make a follow spot with a mover.
Once the application is open, it runs in the background without any need for intervention.
Each TwisterEos customization can be saved as presets that can be instantly recalled, multiplying its already extensive possibilities.
Last but not least, these presets can be exported to a file that can be easily re-imported as required.
2 - The Midi Fighter Twister (MFT)
The Midi Fighter Twister is a MIDI control surface designed by the American firm Dj TechTools. It is composed of sixteen precision rotary encoders with push button, ring of LEDs for feedback, and 6 surface buttons on the sides (three on the left side and three on the right side).
These controls are replicated within four banks, thus offering access to up to 134 different MIDI parameters, all configurable via Midifighter Utility, the dedicated Mac/PC editor.
3 - Why this controller?
Having never found an inexpensive control surface with motorized linear potentiometers silent enough to use during an theater play in the middle of an audience, I ended up abandoning the idea and only using rotary knobs with endless course and feedback (= encoders with LED rings).
Certainly the feeling is not the same as a fader but for me it is the best compromise for the moment, while waiting for the miracle control surface (reliable, compact, silent, easily configurable and cheap!).
But even a good controller only with knobs is not so easy to find.
After numerous attempts, my choice fell a few years ago on the MFT mainly for the following reasons:
-
Build quality, robust, compact, easy to carry on tour.
-
Accuracy of rotary potentiometers.
-
Fully configurable, with features that few other control surfaces have.
-
Simple and powerful software editor.
-
Can be used for other purposes/shows with other software.
-
Easily resellable.
-
Silent.
Disadvantages:
-
A little bit expensive, but the price is justified for a professional use.
-
Push buttons maybe a bit stiff.
To sum up, the Fighter Twister is confined to only sixteen physical rotary knobs, but with high quality design and with a powerful and well thought-out editor allowing them to be exploited to the maximum of their possibilities.
IMPLEMENTATION
1 - Configuring the Fighter Twister
First of all, you have to configure the controller internally using Midifighter Utility, the dedicated editor provided by DJTech Tools. This operation only has to be carried out once.
You will also need the configuration file specific to the use of MFT with TwisterEos "TEos_MFT_config"
(this is a Google Drive link, but no Google account is required):
Once these files have been downloaded and Midifighter Utility installed on your computer, connect the Fighter Twister via USB without going through a hub .
You can go through a hub later to use it, but it is not recommended to do so to configure it.
- Open Midifighter Utility.
- Check the firmware version on the top left and update it if necessary (important!) by following the instructions on this link. The latest version is dated June 8, 2023.
The file to install is the first one starting with "Twister 0050---.hex" (and only that one).
- Reset the MFT to factory settings (especially if you bought it used) by going to Tools/Midi Fighter/Factory Reset and confirming the reset.
- Go to File/Import and select the downloaded TEos_MFT_config file.
- Click on the blue "SEND TO MIDIFIGHTER" button at the bottom of the editor to transfer the configuration to the controller.
- Close Midifighter Utility.
- Unplug and replug the controller.
The configuration is saved in the MFT's internal memory. This operation therefore only needs to be carried out once.
It is possible that an update of TwisterEos may require the MFT to be reconfigured with a new file. This will be specified in the release notes. It is recommanded to disconnect and reconnect the MFT after the transfer for the new file to take effect.

Midifighter Utility interface
2 - First steps with TwisterEos
2.1 - Downloading and launching
Before downloading and using TwisterEos, please take note of the license agreement.
You can download the latest version of TwisterEos by clicking on the Google Drive link below (no Google account required):
Once the file is unzipped, open the main directory.
Inside are several files and folders (including a folder named "resources").
These files must always stay together in the same main folder and the "resources" folder must not be deleted, modified or renamed, otherwise the application will not work.
• Windows 10+
TwisterEos doesn't require any installation. Simply double-click on the "TwisterEos.exe" file in the main folder to launch the application. The file must remain in its folder, but for convenience you can easily create a shortcut on your desktop (right-click on the file --> "Send to" --> Desktop).
When you first open TwisterEos, you may see a Windows Defender firewall window. You must allow access to use the application.
► Note 1: TwisterEos can sometimes be detected as a Trojan by Windows Defender. This is a false positive. You can check the integrity of the file on www.virustotal.com
► Note 2: In Windows 11, you may need to run the file as an administrator the first time (right-click on the icon and select “Open as administrator”).
• MacOS
Drag and drop the unzipped folder into your Applications folder (the whole folder, not only the .app file!).
Before launching the "TwisterEos.app" file located inside, sign it using the Sentinel utility by following these instructions (this step is essential for TwisterEos to work properly).
Once the .app file has been signed, you can launch it by double-clicking on it.
2.2 - Overview

[A]- Network configuration.
[B] - Presets management.
[C] - Additional features.
[D] - Make a donation.
[1] - Active mode (Fader or FCB).
[2] - Snapshots.
[3] - Alt (alternative) buttons.
[4] - Pages buttons.
[5] - Level wheel.
[6] - Selection of FADER mode.
[7] - Selection of FCB mode.
TwisterEos can be seen as an interpreter allowing the MFT and Eos to communicate with each other.
On the one hand, it receives MIDI commands from the MFT and translates them into OSC to send them to Eos.
On the other hand, it receives OSC messages from Eos that will modify in MIDI the LED display on the MFT.

No command to Eos can be made directly from the TwisterEos graphical interface (by clicking on an encoder symbol with the mouse for example).
To control a parameter in Eos, you must use the MFT.
The TwisterEos graphical interface is used to visualize and customize certain parameters such as fixtures parameters, Snapshots and Macros.
These customizable parameters are all highlighted in dark blue (except for the network parameters [A]).
They are stored in the TwisterEos preset system ([B]).
The interface is divided into three main areas: the upper panel, which allows general management of the application (network configuration and management of presets), the large lower window representing the Midi Fighter Twister controls and the right windows with additionnal options.
TwisterEos is entirely designed around two distinct modes:
► The Fader mode for managing the Eos faders.
► The FCB mode for managing the FCB parameters of the automatic projectors.
The two buttons [6] and [7] on either side of the MFT (and in the TwisterEos window) select the mode and display the corresponding commands in the main window [1].
Important note: the ten encoders in window [1] are relative to both modes, and the commands associated with them differ according to the mode selected.
The other encoders are independent of the mode and the associated commands are always the same, whatever the mode selected.

Fader mode

FCB mode
- PUSH : page selection.
- PUSH Page1 + PUSH Page2 : selection of the special page.
- ROTATION : no action.
-
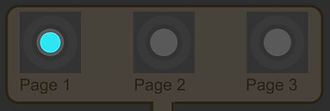
• Page buttons
Fader and FCB modes are organized in several pages that can be recalled via the Page buttons.
The color of the Page buttons LEDs changes according to the selected mode (FADER: fuchsia, FCB: blue-green).
This is the way of quickly identifying the active mode on the MFT.
A special page for each mode can be accessed by pressing the Page1 and Page2 buttons simultaneously, namely the MasterFad page and the AutoMap page respectively in Fader and FCB mode.
► Note: “Page1”, ‘Page2’ and “Page3” (without spaces) are the names of the buttons.
Other pages beyond three can be accessed in combination with the Alt1 and Alt2 buttons.
-
• Alt buttons
The Alt1 and Alt2 buttons can be seen as the ALT key on a computer keyboard: used in combination with some of the other buttons on the MFT, they allow you to give them a different functionality than the basic one.
Only the Push of these two encoders has an action. The rotary has no effect.

- PUSH : Alt1 (or Alt2) to be used in combination with others encoders.
- ROTATION : no action.
► Note: the most frequent commands are directly accessible, so you don't need to know the combinations with Alt1 and Alt2 to start using TwisterEos.
-
• Level wheel
The level wheel is common to both modes in order to be permanently accessible whatever the selected mode.

- PUSH : Select Last.
- ALT1 + PUSH : Select manual.
- ROTATION : level wheel.
• Contextual help
In order to simplify the use of TwisterEos without having to resort to this online documentation, a small contextual help appears after one second when you hover the mouse over an element of the graphic interface.
2.4 - Network configuration
• Setup with a single Eos
If your MFT is connected to a computer running Eos and there are no other Eos on the network (i.e. your Eos is open in Principal), simply enter the IP address 127.0.0.1 in Eos setup :
- Go to Setup / System settings / Show Control / OSC.
- Enter the address 127.0.0.1 in the "OSC UDP TX IP Address" field.
- Check that the "OSC RX" and "OSC TX" buttons are enabled and that the RX and TX ports are set to 8000 and 8001 respectively.
In TwisterEos, leave the default settings in the top-left window (if you have no particular reason to change them).


OSC settings in TwisterEos
OSC settings in Eos
The small dot to the right of the “Rx OSC port” field in TwisterEos lets you check whether the application is receiving OSC messages from Eos. To test, simply select/deselect circuits in Eos, and the dot will flash.
• Setting up with Eos in Client (or Backup) mode
If you're working on an installation with several networked Eos, for example one configured as Main and the other as Client, it's perfectly possible to use the MFT with the Client.
► Note: The method is the same for an Eos configured as Backup.
To do this, TwisterEos must be open where the MFT is connected (i.e. on the Client).
In a network configuration, only the Principal receives and sends the OSC. Since the IP addresses entered in Eos and TwisterEos are the destination addresses for OSC messages, the IP addresses must be configured as follows:
- The IP address of the Master must be entered in TwisterEos.
- The IP address of the Client must be entered in the Client and the Master OSC setup.
OSC ports RX and TX must also coincide between TwisterEos, the Client and the Principal.
By default, they don't need to be changed (RX 8001 and TX 8000 for Client and Principal, and RX 8000 and TX 8001 for TwisterEos).
Please note that TwisterEos will only work if all Eos are on the same user.
If you encounter communication problems between TwisterEos and Eos, try to disable your firewall for TwisterEos.
► Note 1: since multiple IP addresses can be entered in the “OSC UDP TX Adressse IP” field, you can connect Eos to a third-party application even with TwisterEos already connected (Live, Millumin, Resolume, Cuelab, etc.).
For this, please refer to this tutorial by Sam Smallman.
► Note 2: you can connect the MFT to a physical Eos console without the Nomad, simply via your computer running TwisterEos (interesting for owners of the Element 2, for example, or if you prefer to manage FCB parameters with the MFT rather than the console itself ;-) ).
2 - First steps with TwisterEos
3.1 - TwisterEos Presets
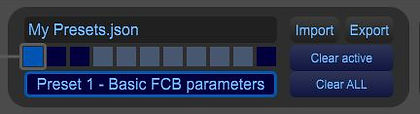
The TwisterEos preset system allows you to save and instantly recall all of your settings manually customized in the interface (in the dark blue fields).
These include FCB parameters, Snapshot and Macro numbers, color forcing pads, CustoMap button status, etc.
You can save up to 11 presets:
- Save a preset: [Shift] + Click in a small grey box.
- Update a preset: select the preset to be modified, make the changes, then do [Shift] + Click in its box again.
- Copy a preset : select the preset to be copied then [Shift] + Click in the destination box.
- Delete a preset: select the preset to delete and click on "Clear active".
- Delete all the presets: click on "Clear ALL".
You can enter a name for each preset in the text field below the boxes. This name will be saved in the preset itself when you save it.
- Preset 1 is loaded by default when you open the application.
- Preset 11 is an empty preset by default allowing to start from scratch without having to empty all the fields one by one. It is therefore advisable not to overwrite it (although it is of course possible).
- Preset 3 is an example with some pre-configured parameters in the FCB pages.
All the presets can be exported to a file and then re-imported via the Import and Export buttons.
If a change is made to a preset, a save window will open automatically when you close the interface to propose you to save the file again.
► Note: Preset files do not necessarily need to be saved in the TwisterEos directory (but you can do so if you wish).
3.2 - FCB mode
FCB (Focus Color Beam) mode is obtained by pressing the right-hand side button closest to you on the controller.
It allows you to select the projector parameters you wish to control with the MFT (Pan, Tilt, Zoom, Iris, etc.) from six pages, each comprising ten possible parameters.
The Custom Map button at the very bottom correlates the selection of these six custom pages with the display of the Intensity, Focus, Color, Shutter, Image and Form categories in the Eos Encoder Display.
A special page called AutoMap switches the MFT into a mode as close as possible to FCB parameter management with a physical Eos console, using four encoder wheels and six category selection buttons.

A custom page
in FCB mode
To choose a parameter you want to control with an MFT encoder:
- Select one of the six FCB pages at the bottom of the MFT (+Alt1 for pages 4 to 6).
- Select the fixture in Eos.
- Select its parameter from the drop-down menu of the encoder in TwisterEos.
► Note: this process makes the interface easier to read by displaying only the parameters of your fixtures and avoiding having dozens of useless parameters displayed in the drop-down menus all the time.
The list of parameters in the drop-down menus is automatically updated in real time according to the fixture(s) selected in Eos. If several different fixtures are selected, their parameters are added together in the drop-down menus.
A parameter remains assigned to an encoder until a new parameter is selected to replace it.
If the parameter assigned to the encoder is common to different types of projectors (such as Pan or Tilt, which are regularly found) the encoder will work for all fixtures having that parameter.
• Parameter button
Parameter buttons are the encoders used to set the FCB parameters of an automatic projector. T
here are ten in the Custom FCB pages and four in the AutoMap page.
- ROTATION: adjustment of the parameter.
- PUSH + ROTATION: coarse adjustment.
- ALT1 + ROTATION: super fine adjustment.
- ALT1 + PUSH: Home position of the parameter.
- ALT2 + ROTATION: Min and Max of the parameter (counterclockwise=Min, clockwise=Max).
- ALT2 + PUSH: parameter softkey
► Note: animations of the LED rings confirm that the ATL1 or ALT2 button combinations have been executed.
The color of the MDT LED segments is set automatically according to the parameter categories from Eos:
- Intensity: red - Shutter: orange
- Focus : green - Image: yellow
- Color : fushia - Form : purple
These colors were chosen arbitrarily for TwisterEos and the MFT and have no correspondence in Eos.

- PUSH: select custom pages 1 to 3
- ALT1 + PUSH: select custom pages 4 to 6.
- ROTATION: no action
• About the Page buttons in FCB mode
► Note: the fact that there are ten parameters per custom FCB page is specific to TwisterEos ergonomics.
This does not reflect any identical distribution in Eos (unlike the ten-fader pages).
Custom Map option
- Activation/deactivation button of the CustoMap mode
When this option is enabled, the FCB mode in TwisterEos controls the display of the categories and parameter pages of the selected Custom Map in the Encoder Display in Eos.
Thus, if you create a Custom Map with the same settings in Eos as your FCB mode in TwisterEos (in the same order, with the same distribution within the different pages) you will be able to view your settings in the Encoder Display when you adjust them.
This option does not change the overall working principle of the standard FCB mode in TwisterEos. It is only a "convenience" option that allows you to view the parameters you are adjusting with the MFT in the Encoder Display in real time.
The CustoMap option eliminates the need to manually select parameter categories in the Encoder Display.
As soon as you change the level of a parameter on the MFT, it is automatically displayed in the Encoder Display.
When the CustoMap mode is activated in TwisterEos:
- The MFT's Page buttons trig the Intens, Focus, Color, Shutter, Image and Form softkeys respectively in the Eos Encoder Display.
- Successive presses on a Page button increment the sub-page numbers represented by the small white dots under the category name in the Eos Encoder Display.
► The white LEDs on the MFT's Page buttons correspond to these white dots.
► Since TwisterEos FCB pages have ten parameters and a parameter page in Eos displays a maximum of four parameters, the number of pages per category cannot exceed three:
• The first line of MFT encoders corresponds to sub-page 1 (four parameters).
• The second line corresponds to sub-page 2 (four parameters).
• The third line corresponds to sub-page 3 (two parameters only).

Custom Map option enabled.


The first LEDs on the encoders indicate the selected sub-page.
In the example opposite, we can see that the first sub-page of the Focus category is selected thanks to the horizontal bar and the small blue-green dot on the right.
This sub-page contains four parameters : Pan, Tilt, Edge and Zoom.
The second sub-page contains just one : Iris.
The third contains none.
Since Eos does not return any OSC information for selecting parameter categories, TwisterEos has no way of knowing what changes the user has made directly from the Encoder Display. The CustoMap option in TwisterEos is therefore unidirectional, i.e. it only works in the TwisterEos to Eos direction.
This is not a problem in itself, but it does require some care. If a category has been selected directly in the Encoder Display and a difference in display appears with the MFT, simply reselect a page or category from the MFT and the two will match again.
► Note 1: as the {Custom} soft key in the Encoder Display has a toogle behavior and its current state is not transmitted in OSC by Eos, TwisterEos has no way of knowing it. This is why a message appears when you activate the Custom Map button in TwisterEos, asking you to synchronize the two. This then enables TwisterEos to automatically deactivate the button when the AutoMap page is selected, or conversely, to reactivate it when a Custom FCB page is selected.
This functionality proves extremely useful once you get the hang of it.
For example, you can work in AutoMap mode while having a customized page with your nine shutter parameters (Thrust A B C D, Rotation A B C D and Frame assembly) directly at hand, or have Pan, Tilt and Zoom on the same page.
► Note 2: as a result of the previous note, TwisterEos' Custom Map button is not recordable in Presets, so that TwisterEos can know its status by forcing the user to activate it manually (or not).
In short, it's simple: when you enable or disable the Custom Map option in TwisterEos, you need to do the same with the Custom softkey in Eos.
Presentation of the Custom Map option
AutoMap page
The AutoMap page lets you manage FCB parameters using the MFT's first four encoders, and select categories (Intensity, Focus, Color, etc.) using the Push of the following six encoders, in the same way as an ETC's programming wing.
On the AutoMap page, the MFT controls the 4 parameter wheels in the Encoder Display (even when folded). This allows you to view and adjust values directly in Eos, just as you would with a physical console.

{1} - Selection of the AutoMap page.
{2} - Selection of the categories.
{3} - Parameter wheels.
The AutoMap page is accessed by pressing the Page1 and Page2 buttons {1} simultaneously in FCB mode.
The encoders at the top of the MFT {3} then become four Parameter wheels and the Push of the next six encoders {2} selects the categories (Intens, Focus, Color, Shutter, Image and Form).
The fixtures you select in Eos automatically map to the four encoders according to the selected category and the sub-page in that category.
The LED segments take on the color of the category, in this case orange for the Shutter category (see Frame 4 below).
Successive presses on the Category encoders increment the sub-pages within the category.
The white LEDs around the MFT Category encoders indicate the sub-page: one LED = sub-page 1, two LEDs = sub-page 2, three LEDs = sub-page 3, etc. (see frame 5 below, example of page 1 selection for the Shutter category).

{4} - The four Parameter encoders on the MFT.
The LED segments automatically adjust to the color of the selected category.
{5} - Example: Page 1 of the Shutter category is selected.
Note: the six Category buttons have their own color, identical to the colors of the custom FCB pages.
The functionalities of the four encoders as well as those related to the Alt1 and Alt2 buttons remain unchanged compared to the standard FCB mode:
- ROTATION: adjustment of the parameter.
- PUSH + ROTATION: coarse adjustment.
- ALT1 + ROTATION: super fine adjustment.
- ALT1 + PUSH: Home position of the parameter.
- ALT2 + ROTATION: Min and Max of the parameter (counterclockwise=Min, clockwise=Max).
- ALT2 + PUSH: parameter softkey
Similarly, for the six Category buttons :
- ALT1 + PUSH: Home of the category.
- ALT2 + PUSH : softkey of the category (writes the category name in the Eos command line).
Note1: just like the CustoMap option in standard FCB mode, the AutoMap page is unidirectional, i.e. it only works in the TwisterEos to Eos direction. If a category has been selected directly in the Encoder Display and a difference in display appears with the MFT, simply reselect a category from the MFT and the two will match again.
Note2 : to deselect the AutoMap page, simply reselect a page from 1 to 3.
Video presentation of the AutoMap page (formerly known as “EncoDis page")
3.3 - FADER mode
Fader mode is accessed by pressing the left-hand button closest to you on the controller.
It allows you to control Eos faders via the MFT, view their contents, configure snapshots linked to fader pages and, if required, force the color of the MFT encoder LED segment according to the fader mode in Eos (Inhibit, Additive or Effect).
The display of the ten encoders is automatically updated according to the page selected.

Fader page
• Fader button
The Fader buttons correspond to the ten encoders on the Fader pages.

- ROTATION : level of the fader
- PUSH : [BUMP]
- ALT1 + PUSH : [Grp/Assert]
- ALT2 + PUSH : [Load]
- Cross: cancels the "forcing" of the color.
- Red dot: forces the color of the encoder to red for a fader in Inhibit mode.
- Yellow dot: forces the color of the encoder to yellow for a fader in Effect mode.
• Automatic adaptation of the encoders color according to the faders content
When changing fader pages, the color of the LED segment below the MFT's encoders adapt automatically to the type of content of the Eos faders. The ETC color code was tried to be respected as much as possible: golden yellow for Subs, green for Cue Lists, red for Grand Master, brown for Palettes and Presets, etc. (a bit difficult with the rather basic color of the MFT's LEDs).
In addition, a fader with no content in Eos will appear off in TwisterEos and on the MFT.
• Manual color forcing of an encoder according to the fader mode
Since Eos does not return OSC information on the fader mode (Additive, Inhibit or Effect), it may happen that the color of the MFT LED segments differs from that of Eos faders when the latter are configured in Inhibit or Effect.
To compensate for this visual inconvenience, you can manually force the color of an LED segment in TwisterEos using the small dots to the right of each fader button.
• Functions of the Page buttons in Fader mode
Eighteen fader pages can be accessed directly from the MFT with TwisterEos.
To make these pages easier to memorize, Alt1 and Alt2 key combinations have been standardized for pages 1 to 9 and 11 to 19, with only the double push* instead of the different single push.
Example: Page 4 = Alt1 + PUSH.
Page 14 = Alt1 + Double PUSH.
Consequently, it is not possible to call page 10 with the MFT.
These eighteen pages are divided into six banks of three pages each.
- Bank 1: pages 1 to 3 - Bank 4: pages 11 to 13
- Bank 2: pages 4 to 6 - Bank 5: pages 14 to 16
- Bank 3: pages 7 to 9 - Bank 6: pages 17 to 19

- PUSH on each button: pages 1 to 3.
- ALT1 + PUSH: pages 4 to 6.
- ALT2 + PUSH: pages 7 to 9.
- DOUBLE PUSH*: pages 11 to 13.
- ALT1 + DOUBLE PUSH: pages 14 to 16.
- ALT2 + DOUBLE PUSH: pages 17 to 19.
- ROTATION: no action
* Press it twice as fast as you would with a double click on a mouse.
Even if you don't use all the pages, you can take advantage of the bank layout to organize your faders more easily by choosing which type will go in each bank (e.g. intensity subs in Bank 1, special subs in Bank 2, effects in Bank 3, etc.), even if it means leaving some pages completely empty.
Note: the animation of the Page button LED segment is specific to each bank:
- Bank 1: steady LED
- Bank 2: one pulse
- Bank 3: two pulses
- Bank 4: two flashes
- Bank 5: one pulse then two flashes
- Bank 6: two pulses then two flashes
(Mnemonic: Alt1 = one pulse, Alt2 = two pulses. Double push = two flashes).
An Eos snapshot number that will be called up at the same time as the fader pages can be specified in the small boxes under the encoders (see Snapshots).
A snapshot of each of the eighteen fader pages can thus be created in Eos (Tab 28) and recalled each time the corresponding button is pressed on the MFT.
The same applies to the special MasterFad page.
Use the mouse hover in the TwisterEos interface to check which page the boxes correspond to.
Just like the FCB settings, the color forcings (and their cancelation) need to be saved in a TwisterEos preset so that they can be retrieved in a later session (the dots are on a dark blue background).
Warning: when you change presets, it is necessary to recall the fader page you are on with the MFT so that the forced color of the encoders is updated (both in the TwisterEos interface and on the MFT itself).
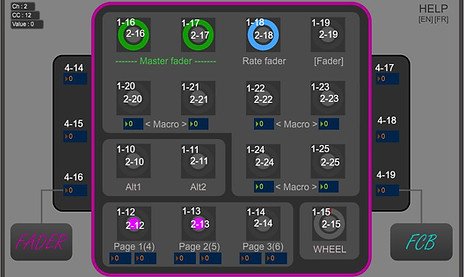
MasterFad page
In Fader mode, the key combination Page1 + Page2 gives access to the special MasterFad page allowing to control the Master fader and the Rate of Eos with the encoders 1, 2 and 3 of the MFT.
It also gives access to six customizable Macros as well as the Eos Fader hardkey.

{1} - Master fader.
{2} - Rate Fader.
{3} - Eos Fader hardkey.
{4} - Customizable Macro buttons.
{5} - Eos FX managment.
{6} - Selection of the MasterFad page.
The MasterFad page is accessed by pressing the Page1 and Page2 buttons simultaneously in Fader mode.
• Master Fader

Encoder 2:
- PUSH: no action
- ROTATION: fader level.
- DOUBLE PUSH : active/deactive "Linked"
Encoder 1:
- PUSH: Go.
- ROTATION: fader level.
- ALT1 + PUSH: Stop/Go Back.
► Important note : in order for both Master fader encoders to work—as well as the Rate (see next paragraph)—faders 8 and 9 on page 100 in Eos must be configured with cuelist 1 (and in “3x” with the Master Rate fader on the tenth fader).
When activated, the Linked button connects the right master fader to the left one, turning only the latter to perform symmetrical transfers. The main purpose of this function is to enable you to use just one hand to perform this type of transfer, and to do so more precisely.
For more convenience, this feature can be activated/deactivated directly from the MFT by double-pushing encoder 2. The double Push has a "toggle" action, i.e. it activates/deactivates the function alternately. Activating the button sends the value from encoder 1 to encoder 2 when turned. Deactivating it disengages the two encoders, restoring their original independant functionality.
As soon as the Linked button is switched on, the LED segment of encoder 2 flashes.
The state of the Linked button is stored in TwisterEos presets.
• Rate Fader
When activated, the GO Auto Reset and Q End Auto Reset buttons automatically initialize the Rate to 100% when the GO is pressed and at the end of a cue, respectively. The main purpose of these functions is to avoid forgetting the Rate at a value other than 100% after manipulating it during a transfer.
This feature can also be activated/deactivated directly from the MFT by double-pushing the encoder. Activation switches the buttons on in the state in which they have been manually configured in the interface (either one on, the other, or both). Deactivation switches both buttons off.
As soon as one of the two buttons is switched on, the encoder's LED segment flashes.
The state of these buttons are stored in TwisterEos presets.
Important note: In order to obtain the expected behavior with the Rate encoder programmed in TwisterEos, you need to configure Eos fader 8/page 100 as in the screenshot below.
It must be configured with cuelist 1 and in "3x" so that the Rate fader corresponds to the tenth fader on the page:

- PUSH: no action.
- ROTATION: Rate adjustment between 0% and 200%.
- ALT1 + PUSH: Reset the rate to 100%.
- ALT2 + PUSH: Eos [RATE] key.
- DOUBLE PUSH: activation/deactivation of "GO Auto Reset" and "Q End Auto Reset" functions as configured from the TwisterEos interface.

• Eos [Fader] button
• Macro buttons

- PUSH : Eos [FADER] key.
- ROTATION : no action.

- PUSH : triggers the macro configured in the field below.
- ROTATION : no action.
The box under each encoder allows you to choose the Macro number that will be called.
This number is highlighted in blue, so it will be saved in the TwisterEos presets.
To make sure that no Macro is called, enter "0" (the box turns dark blue).
You can enter the number either with your computer keyboard or with the mouse wheel (hold down the SHIFT key on your keyboard for more precise scrolling).
• Eos FX managment
To open the FX window in Eos, push the FX Rate and FX Size encoders together.- To control an effect, first select it in the FX window in Eos (1st column)- To stop an FX, select it and push the two FX encoders together for 1s.

- ROTATION: adjustment of effect Rate (or Size).
- PUSH + ROTATION: coarse adjustment (in steps of 10).
- ALT1 + PUSH: effect Rate (or Size) at 100%.
- ALT2 + PUSH: enters “Rate” (or “Size”) in the command line.
- PUSH on both encoders simultaneously: opens the Effects window.
- PUSH simultaneously on both encoders for 1s: Stop effect.

► Note 1: there is no native OSC command for managing the Rate and Size of effects in Eos.
TwisterEos achieves this through an internal workaround via the command line. This workaround requires you to select the language used by Eos using the little blue EN/FR button located between the two encoders.
Only French and English are available.
► Note 2: TwisterEos has no way of knowing the current value of an effect when you open the Effects window (Eos doesn't send this OSC information). This is why the application systematically restarts them from 100 as soon as you set them.
3.4 - Eos Snapshots

Each of these boxes in TwisterEos allows you to select a Snapshot that will be recalled in Eos when you press the corresponding button (note the number in the Snapshots box in orange, which differentiates it from the Macro box in light green).
It is thus possible, for example, to create a "Fader" and an "FCB" snapshot in Eos which will be recalled each time the Fader mode or FCB mode button on the MFT is pressed.
The other two buttons on either side allow you to recall any snapshot of your choice.
Similarly, you can create snapshots with an individual view of each of the eighteen fader pages that will be called up when the corresponding Page button is pressed and thus view your virtual fader in Eos at the same time as you operate the MFT.

The number specified will correspond to the Snapshot triggered by the first Page button of each bank.
Snapshots of the other two pages are automatically incremented by 1 by TwisterEos.
For example, if you enter 101 in the Snapshot box marked "1>3", the Page1 button will trigger Snapshot 101, the Page2 button will trigger Snapshot 102 and the Page3 button will trigger Snapshot 103.
You can therefore choose Snapshot number "n" for the first page of each bank, and those for pages 2 and 3 will automatically be numbered "n+1" and "n+2".
A Snapshot number can also be specified for the TwisterEos MasterFad page.
If you don't want any Snapshots to be recalled, enter "0" (the box turns dark blue).
Snapshot numbers are saved in TwisterEos presets.
3.5 - Additionnal options
The window on the right of the interface gives access to a set of new features introduced in version 3.0 of TwisterEos. These options are displayed in blue fields and therefore saved in presets.
• TwisterEos main window size
_
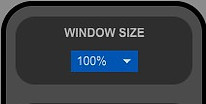
- Resize the main TwisterEos window between 50% and 100% (in 10% steps).
• Gamepad
_

- Enable/disable the Gamepad option for controlling projectors using a video game controller such as XBox or PS4/5.
- Gamepad configuration (Settings button).

Gamepad configuration window
Beyond its playful aspect, the main purpose of this feature is to do a follow spot using an automated projector. This is how it was designed and developed.
The Gamepad option is still at a fairly experimental stage and will need to be refined as new versions of TwisterEos are released and user feedback is received.
The button functions are detailed in the context-sensitive help when you hover over them with the mouse.
They will not be listed here in full.
However, here are a few details:
• TwisterEos should detect the most common controllers on the market (but only Xbox and Play Station 4 controllers have been tested).
• If your Play Station controller is not recognized by your PC, you can install the free, open-source DS4Windows emulator.
• To control a projector, simply select it in Eos (you can also select and control several projectors at the same time if you wish).
• Pan and Tilt are controlled using both joysticks together, one with normal sensitivity and the other with more precise sensitivity. By using both simultaneously, you should be able to control the beam movement relatively smoothly.
• The AltA and AltB buttons on the gamepad give you access to additional functions for certain other buttons.
As their different names suggest, these buttons are independent of the Alt1 and Alt2 buttons on the Midi Fighter Twister.
• The four buttons on the right (A, B, X, and Y) can be used in combination with the AltA and AltB buttons to trigger twelve Eos Presets, allowing you to choose their contents—unlike palettes—and organize them as you wish in banks of four.
For example, you can configure one bank with four presets containing focus parameters, another with color parameters, and a third with beam parameters.
• The intensity and size of the beam can be adjusted using the cross either by pressing it repeatedly (1% increments) or by holding it down for faster adjustment.
• You can adjust (or flash) the intensity and size of the beam using the two triggers.
• Once the Intensity trigger is fully depressed (left trigger), if you want the intensity to remain at 0%, press the bottom cross twice. The same applies to the beam size (double press on the left cross).
► Note 1: While a follow spot with an automatic projector in FOH or in backlight is generally fairly easy to do, it is much more difficult with a toplight (reversal of the pan when the tilt reaches 0°).
► Note 2: it's perfectly possible to use a gamepad with TwisterEos without a MFT connected.
Video presentation of the Gamepad option
• Robust Bump
_

- Activation/deactivation of Robust Bump mode.
The Robust Bump mode is designed to prevent minor changes in the values of the fader encoders that can occur during repeated and intensive pressing of the Bump (Push) button, for example during concert use.
However, this mode causes a permanent latency of 200ms in the encoder and deactivates it for 1.5 seconds after the Bump is released.
• MIDI monitoring of the Midi Fighter Twister
_

- MIDI monitoring of Midi fighter Twister.
This window allows you to check whether the incoming MIDI signals from the Midi Fighter Twister are those expected by TwisterEos after configuring the controller using the configuration file.
To make sure:
- Press the buttons on the MFT and check that the incoming MIDI messages correspond to those in the four illustrations below for each of the two modes and special pages.
►The first digit is the MIDI channel number (Ch).
►The second digit is the note or Control Change (CC) number.
--> Example: 1-12 means Channel 1, Note 12 (or CC 12).
►The message in the center corresponds to the Push button and the one at the top left to the rotary potentiometer.
► Note: the screenshots below are from an older version of TwisterEos, but the MIDI messages are correct.

MIDI messages for the FADER mode (MFT bank 1).

MIDI messages for the FCB mode (MFT bank 4).
MIDI messages for the MasterFad mode (MFT bank 2).

MIDI messages for the AutoMap mode (MFT bank 3).
_
MISCELLANEOUS NOTES
1 - Future dev
- Collaborative management of FCB parameter assignment exceptions in AutoMap mode.
- Improved Gamepad option (joystick sensitivity adjustment and additional features).
- Automatic loading of the last preset file used when the application is opened.
2 - Limitations and known bugs
Limitations
-
Known bugs
- When adjusting the Size and Rate of an effect using the two FX encoders on the MasterFad page, a serie of channels may appear in the command line. This typically occurs only once per Eos session, during the first adjustment.
3 - Release notes
Version 3.02 (current) - May 19, 2026 (tested with Eos 3.3.6 b60).
-
Fixed a major bug on the macOS version where OSC feedback from Eos was not being received.
-
Minor bug fixes.
Version 3.01 - May 7, 2026
This update is primarily intended for macOS users who are experiencing issues in version 3.0 with the items listed below, particularly the first three (Request code, Support code, and License Agreement).
If you still encounter issues despite this update, please refer to this section in "Troubleshooting".
Please take 5min to let me know if it worked or not—some future TwisterEos features depend on it! (contact links at the top right of this page).
- For macOS users:
General
- The Request code is now generated correctly (bottom right in the donation window).
- The Support code should now work, and the logo that replaces the donation window should appear automatically every time you open TwisterEos without having to re-enter the Support code.
- The License Agreement window is supposed to appear only once, the first time you open TE.
- The TE icon now appears in the Dock, Launchpad, and Finder.
- For all users (macOS and Windows):
General
- New app icon (blue “T”).
In FCB mode / AutoMap page
- Fixed a bug where Alt 1 (or 2) + Category button would sometimes select the category (which was not intended) and leave a small white LED lit unexpectedly on that category’s encoder.
- A category’s subpage now remains the same when selecting a different projector type (previously, TE would always revert to subpage 1). Subpages are therefore consistently aligned in TwisterEos and in the Eos Encoder Display, regardless of the selected projector(s).
In FADER mode
- Fixed a display bug with the MasterFad page snapshot.
- Fixed a bug where the LED segment on the Page2 button would flash unexpectedly when selecting the MasterFAD page.
- Shortened the flashing cycle of the LED segments on the Page buttons (for faster page identification).
- Version 3.0 - June 11, 2025
This version requires MIDI reconfiguration of the MFT with the TEos_MFT_config file, which can be downloaded here.
► Important note: your TwisterEos presets will no longer be compatible with this new version, so you will need to recreate them (you can still try importing your preset files to see, but they will not match what you had saved).
General
- Initialization page when the application is opened, with a warning if no MFT is detected.
- Resizing of the TwisterEos main window between 50% and 100%.
- Ability to control an automatic projector with an Xbox or PS5 game controller.
- MIDI monitoring window to check that the MFT is sending the correct MIDI messages.
- Donation window. If the users make a donation, they will receive a Support Code by email allowing them to replace this window with a logo showing their support.
- Alt1+Push on the WHEEL encoder now allows you to select manual circuits (Select manual).
In FCB mode
Custom FCB pages
- Implementation of six custom FCB parameter pages (instead of three previously).
In addition to being able to manage more parameters, this now allows all six categories to be displayed in the Eos Encoder Display when the Custom Map option is enabled in TwisterEos.
- When the Custom Map option is enabled in TwisterEos, the {Custom} softkey on the Eos Encoder Display is now automatically disabled when switching to the AutoMap page, and re-enabled when returning to the custom FCB pages.
- A slightly longer press (0.5s) on the Page buttons opens the Eos Encoder Display (or closes it if it's already open).
AutoMap page (formerly EncoDis page)
- Complete overhaul of how FCB parameter auto-assignment is managed on the four top encoders.
This auto-assignment is now much more reliable. It is unlikely that a parameter will be assigned to a category to which it does not belong.
In the future, this overhaul will allow for the implementation of assignment exception management (when ETC deliberately leaves an encoder empty in order to make the distribution of parameters more logical within the subpages).
- Previously, the Focus category was automatically selected by default when switching to the AutoMap page (EncoDis). This is no longer the case: the category that is now displayed is the one that was last selected.
- The same applies to category subpages: when you return to a category after changing it, the subpage that is now displayed is the one that was previously selected.
- When a projector is selected in Eos, its parameters are now automatically updated on the four top encoders in the current category without having to reselect that category on the MFT.
- A slightly longer press (0.5s) on the Category buttons opens the Eos Encoder Display (or closes it if it's already open).
- Added LED ring animation for the six Category encoders when using the Home and Softkey commands for the category name (Alt1+Push and Alt2+Push, respectively).
In FADER mode
Fader pages
- Complete reorganization of how to call up Fader pages with the three Page buttons and the two Alt buttons (See the paragraph “Additional details on the Page buttons for FADER mode” in the FADER mode section).
- Robust Bump mode preventing mini changes in Fader encoder values during repeated and intensive pressing of the Bump (Push).
- Fixed a bug where the Home button on a Fader page (Alt1+Alt2) did not work if Eos was in English.
MasterFad page (formerly called MacroFad page)
- Control of the Rate and Size of effects with the two encoders 9 and 10 (requires selecting the language used in Eos).
- Fixed a bug when activating/deactivating the “Rate Auto Reset” options from the MFT.
- Fixed a bug where Macros higher than 9 did not work.
- Version 2.21 - 03/17/2024
- Version 2.2 - 02/03/2024
- Version 2.1 - 03/23/2023
- Version 2.0 - 01/17/2023
- Version 1.6 - 11/17/2022
- Version 1.51 - 08/30/2022
- Version 1.5 - 07/07/2022
- Version 1.4 - 05/21/2022
- Version 1.3 - 05/02/2022
- Version 1.2 - 04/26/2022
- Version 1.0 - 03/24/2022
4. Make a donation
TwisterEos is available free of charge and I am not seeking to make it a regular source of income.
However, if you like the app and often use it (particularly for professional purposes), you can show your support and encouragement by making a donation.
This donation will go to my EGZOA association, with which I produce my artistic projects in the field of hybrid and digital arts.
If you work for a company or organization, this will provide you with an accounting receipt.
If you would like to donate by means other than credit card, please contact me here.
Removal of the donation window
_
After making a donation, you will have the option to remove the donation window from the TwisterEos interface and replace it with a small logo showing your support. To do this:

- Click on the Request Code button in the TwisterEos interface.
- Copy/paste the 6-digit code and send it by email by replying to the thank you email you received from EGZOA (no need to include anything other than the code). You will receive a 6-letter Support Code in return.
- Enter this code in the Request Code field in TwisterEos.
- Click on the small blue dot on the right.
- Voilà!
► Note 1: The Request code and the associated Support code are specific to the computer on which you open TwisterEos.
► Note 2: The Support code is automatically saved in the TwisterEos directory. You therefore only need to perform this operation once.
5 - Contact
The dedicated Facebook page is the best way to stay
updated on TwisterEos news and updates.
If you have any questions or suggestions, please post them in the comments section below the posts so that everyone can benefit. Otherwise, please contact me via the page's direct messaging system for more specific matters.
If you don't have Facebook, you can contact me via the links at the top right of this page.
6. Thanks
A big thank you to Thibault d'Aubert, Eos trainer and head of the lighting department of the Théâtre National de Strasbourg (France), for his suggestions, his constructive feedback and his minutious beta tests.
Thanks also to the users who give me bug feedback and who contribute to the improvement of TwisterEos.
And finally, thanks to those who just take the time to tell me that it works fine and that they are happy! :-)
TECHNICAL COMPLEMENTS
1. Troubleshooting
This section will give you some ideas for investigating malfunctions in TwisterEos or your MFT.
If you still can't get your MFT to work and you plan to contact me, please specify :
- Your operating system (Windows or mac) and its version
- The version of TwisterEos you are using
- The version of Eos you are using
- And describe what seems to work and what doesn't having of course read carefully this online documentation.
► Note: It is also a very good idea to have in mind the small diagram in section 2.2 to know how the MFT, TwisterEos and Eos communicate with each other.
In any case, to identify the problem:
- Start by eliminating all potential external sources of problems: use only a minimal configuration with your Eos computer and the MFT connected directly (without using a USB hub). Disconnect the computer from any network (but leave your network card or Wi-Fi enabled). Disconnect any other USB and MIDI devices.
- Next, open only TwisterEos (give it time to launch) --> at this point the three LED segments of the Page encoders at the bottom of the MFT should be blinking alternately, indicating that the MFT is receiving MIDI from TwisterEos.
- Now try selecting the Fader mode and FCB mode with the MFT's side buttons facing you the most, as well as switching pages with the Page encoder push buttons --> the TwisterEos GUI should respond to these commands, indicating that it is receiving MIDI from the MFT, even though it hasn't yet set up anything on the network.
- If this is not the case, your MFT is not communicating with TwisterEos (so there is no need to open Eos) --> see the first point below.
- If it does, you can continue prospecting using the other points below.
• Problem: my MFT doesn't seem to communicate with TwisterEos.
The MFT communicates with TwisterEos via MIDI.
To check if your MFT is recognized by TwisterEos, go to File / MIDI setup.
--> "Midi Fighter Twister" must be checked in the Inputs and Outputs columns in the "On" column.
If this is not the case, it may be that the MFT is recognized by Eos or another software (a MIDI device can only be recognized in one application at a time).
For the same reason, think to close Midifighter Utility after uploading the MFT config file and before launching TwisterEos.
Check if MIDI is disabled in the Eos setup. Go to System / Show Control / USB MIDI/SMPTE and check the status of the "USB MIDI/SMPTE" button. If it is activated and you see the Midi Fighter Twister in the table on the right it is probably Eos that has taken over the MFT and TwisterEos cannot see it.For this reason, it is recommended to disable MIDI in Eos if you don't need it, and to start TwisterEos first, before Eos, and before any other third-party application.
If you're on a Mac, open Studio MIDI (the native MIDI device manager under Mac OS) and check that only one instance of Midi Fighter Twister is present, and that this instance is precisely named “Midi Fighter Twister” (and not “MIDI FighterTwister ‘with no space between ’Fighter” and “Twister”, for example).
• Problem: my MFT controls the intensities in Eos (Level Wheel) but not the faders or FCB parameters.
This problem is usually encountered when TwisterEos is running but not receiving OSC messages from Eos.
To be sure, select and deselect projectors in Eos --> the little white dot next to Rx Port OSC in the upper left corner of TwisterEos should be blinking.
If it is not, make sure:
- You have entered the correct IP address in the Eos setup, and that it is the correct IP address.
- You have disabled your firewall for TwisterEos and/or Max.
- Be in User 1 (bottom right of the main Eos window).
- Isolate your computer from any other computer networks in order to limit the sources of problems and do your tests.
Furthermore, to synchronize with Eos, TwisterEos needs you to manually call up a fader page and an FCB page from the MFT after launching the application (this is why you see these flashing messages at launch).
So don't hesitate to switch pages several times at the start, especially after setting up your IP address in TwisterEos.
• Problem: I can't launch TwisterEos.
Under Windows 11, it is often necessary to open TwisterEos in Administrator mode the first time.
To do this, right-click on the executable file (TwisterEos.exe) and then "Open as administrator".
If for some unknown and weird reason you can't open TwisterEos directly on Windows or mac, it can be opened using the free trial version of Max and the .mxf file in the main directory of TwisterEos:
- Go to the Cycling `74 website.
- Download and install the latest version of Max for your operating system.
- Go to the TwisterEos folder and open the "TwisterEos.mxf" file with Max.
► Note: the trial version of Max allows you to create and save patches for a period of 30 days. After this period, the Save options will be disabled but you can continue to open patches, including TwisterEos.
The mxf files are read-only Max patches, it is not possible to modify them.
Max may not be able to find certain external libraries that are necessary for TwisterEos to function, such as the library named "CNMAT".
You can install it manually. To do this:
- Check that your computer is connected to the internet (to be able to download the package).
- In Max, go to the "File" tab then to "Show package Manager".
- In the search bar at the top right, type "CNMAT" and install the proposed package.
- Restart TwisterEos
• Problem: TwisterEos controls some parameters in Eos but not others, and seems to react erratically.
Sometimes a new version of TwisterEos requires you to update the MFT via the Midifighter Utility with the configuration file provided . When doing this, I strongly recommend that you disconnect your MFT from the USB port for a few seconds after the transfer is complete and then reconnect it so that the new configuration can be reset in the internal memory.
Sometimes the configuration file is not loaded correctly into internal memory during the transfer, and the buttons do not configure themselves with the MIDI messages they are supposed to send.
You can check whether the MIDI signals sent by the MFT are correct using the MIDI monitoring window on the right side of the TwisterEos interface. To do so, please refer to the "MFT MIDI Monitoring" paragraph in the Additional Options section.
If the messages displayed in the small monitoring windows differ from those the MFT is supposed to send, you can try the following:
- Factory reset the MFT:
In the Midifighter Utility application, go to Tools / Midifighter / Factory Reset.
- Load an alternative factory firmware:
In the Midifighter Utility application, go to Tools / Midifighter / Load Factory Firmware and try one of the four available firmware options.
- Reload the configuration file.
• Problem: IP address 127.0.0.1 doesn't work.
Check that you are using a version of Eos higher than 3.1.x. If not, the local address 127.0.0.1 will not work. Update your Eos software to the latest version supplied by ETC and available on the website.
For Mac users, it's possible that an older version of the OS is preventing TwisterEos from working with the local IP. For information, the OS on which TwisterEos was tested with the address 127.0.0.1 is Sonoma 14.2.1.
If, for any reason, the 127.0.0.1 IP address still doesn't work, you can try the old method, using an external active IP:


IMPORTANT: in order for Eos to send OSC data to TwisterEos, the IP address must also be entered in the "OSC UDP TX IP Address" field (exactly the same address, not another one from the same range).

Next, you also need to check the network settings.
The transmit (TX) and receive (RX) OSC ports in Eos must be enabled and must match those in TwisterEos:
- The TX OSC port in TwisterEos must be the same as the OSC UDP RX port in Eos.
- The RX OSC port in TwisterEos must be the same as the OSC UDP TX port in Eos.
The default ports in TwisterEos are those of Eos, namely 8000 and 8001. If you have no particular reason to change them, leave them as they are.
• Problem: the Licence Agreement window appears every time TE is launched and/or I have to re-enter the Support Code each time the app is opened for the Support logo to appear.
As TwisterEos is not a notarized Apple application (meaning it has not been submitted to their verification process), certain features are affected (management of the Licence Agreement window and the Support Code, among others).
Apple does allow you to bypass this, but it requires entering command lines in your Mac's Terminal, which is somewhat cumbersome. Fortunately, there is a small utility that handles this simply: Sentinel, very lightweight and freely downloadable via this link: https://github.com/alienator88/Sentinel
-
Quit TwisterEos completely.
-
Install and open Sentinel.
-
Drag the file "TwisterEos_3.01.app" located in the TwisterEos folder into the left panel of Sentinel.
-
Do the same in the right panel.
-> A green checkmark should appear in each field if the file has been processed successfully.

Then try relaunching TE, accepting the Licence Agreement, entering your Support Code (if you have one), closing TE and reopening it. If it worked, the Licence Agreement window should no longer appear, and the Support logo should display directly in the bottom right corner of the interface. The red line should also have disappeared from the Max console.
If you can, please send me a brief feedback on whether this procedure worked or not — it is important for future developments!
Special button combinaisons
There are two kinds:
- Those common to both modes (Fader and FCB), located on the Page buttons.
- Those specific to each mode, located on the Alt buttons.
Some of them are a special kind of manipulation that we will call "Hop-hop" and that consists in quickly turning an encoder about 1/8 turn counterclockwise and then immediately clockwise about 1/4 turn.
A little tricky, but very handy!
• Commands common to both modes:
►Hop-hop with Page2 encoder: Sneak Enter
►Hop-hop with Page3 encoder: Shift+Clear (clears the Eos command line).
Note: no Hop-hop on Page1 encoder for the moment !
• Commands specific to each mode:
In Fader mode:
► Alt1 + Alt2 for 0.5s: initializes to Home the 10 faders of the current page.
(Note: this command clears the Eos command line beforehand).
► Hop-hop with the Alt1 encoder: deploys/folds the CIA.
► Alt1 + Fader View side button: activates FCB View (equivalent to FCB View button).
(Explanation: since I place the MFT on the left side of my computer, this sometimes saves me from having to use my right hand to switch to FCB View. This way I can access almost all the commands with my left hand and keeping my right hand on the keyboard).
In FCB mode:
► Alt1 + Alt2 for 0.5s : clear the Eos command line and sends "select_last home enter".
This command thus instantly puts in Home the selected fixtures in Eos.
► Hop-hop with the Alt1 encoder: Highlight mode on/off.
► Hop-hop with the Alt2 encoder: activates/deactivates the "Custom" softkey (in the Encoder Display).
Tips
• All the blue fields in TwisterEos are customizable, so that everyone can adapt the ergonomics to their own needs. However, once you've found the ideal configuration for you, I strongly advise you to keep it as regular as possible on all your shows (same Snapshots, Macro, Parameters, etc. at the same place), so that using the MFT becomes automatic and you don't have to think about it.
As for me, I know mine so well that I don't even need to look at the MFT any more, I can feel all 16 encoders under my fingers and know exactly where to find all TwisterEos functions (almost) without having to look at the controller.
• Since it is very quick to switch between the custom FCB pages and the AutoMap page thanks to the Page buttons that are always accessible, it is convenient to use both modes in parallel:
- the custom FCB pages to manage your current or favorite parameters, organized on the six pages as it is most convenient for you and as you are used to,
- the AutoMap page to manage more occasional parameters.
• Nothing prevents you from selecting the same parameter several times among the six custom pages. So you can decide for example to dedicate each page to a type of machine, and put back in each one the parameters they might have in common (like pan and tilt perhaps for example).
• It's handy to be able to call up Snapshots with the Page buttons in Fader view, but this can sometimes be bother, especially in show playback.
Since it's easy to duplicate a preset in TwisterEos, don't hesitate to make a second preset by clearing these Snaphots boxes.
Also, don't hesitate to make a "basic" Snaphot in Eos that you can come back to whenever you're a little lost, and that you can configure on one of the MFT's side buttons, which are permanently accessible.
• All the MFT buttons that have an encoder behavior have their central LED lit (blue for the FCB wheels, red for the level wheel).
These LEDs are sometimes difficult to see when the MFT is laid flat. A small support to tilt it at 45° (or more) allows to see all the LED rings and to materialize the location of the side buttons at the same time. ;-)
2. Tips and tricks
In this section you'll find some tips on how to use TwisterEos with the MFT as well as some "hidden" or slightly "exotic" key combinations, especially with the Alt and Pages rotary knobs (supposed to have no action!... 😉 ).
Beware, even if these key combinations (and the associated commands) keep a certain logic with the rest of the interface, some of them are a little odd! They are therefore for users who are already familiar with TwisterEos.
If you are a new user, please skip this section for the moment !

• Sensitivity of MFT Fader encoders.
You can modify the sensitivity of the ten Fader encoders so that they react to the velocity of rotation: the faster you turn the encoder, the greater the influence on fader level. This can be very useful in concert, for example, if you want to have more reactivity on the faders without sacrificing precision.
To do this, go to Midifighter Utility, the MFT editor:
- Select "Bank 1" on the right above the MFT display.
- Click on "MULTIPLE" in the bottom right-hand corner of the window.
- Select the 10 Fader encoders (the orange ones).
- On the left, on the Sensitivity field, choose "Velocity Sensitive".
- Click on "SEND TO MIDIFIGHTER" to upload the changes to the MFT.
If you're not satisfied with the change, just do it again, choosing "Responsive" instead of "Velocity Sensitive" (or re-import the original configuration file).
Remember to always close Midifighter Utility before opening TwisterEos (and conversely).
► Note: this is one of the few customizations possible in MidifFighter Utilty. Modifying the sensitivity (or any other parameter) of other encoders may have unexpected consequences in the functioning of TwisterEos.

-
3. Demo pack
This section will enable you to test the main TwisterEos features using the downloadable file pack below, which includes :
- An Eos session with implementation in Augment3D.
- A TwisterEos preset to match this session, to be imported into the application.
- A pdf file with the instructions.
--
► Notes:
- This tutorial assumes that you already have some basic knowledge of how TwisterEos works and that you have already configured MFT, Eos, and Twistereos.
- The features are presented in the order they appear in the online documentation. It's recommend to follow this order, which allows you to experiment in complementary steps.
- Snapshots in the Eos session are designed for two screens.
- If you are on your computer with Eos Nomad, the network/OSC settings will work directly.